Wednesday, 17 April 2019

Paper Flowers

On Monday evening, I went to the April Caddonfoot WI meeting where we had a demonstration of how to make paper flowers, and chance to make our own. It was great to learn another craft skill and I really enjoyed the process.


Mostly for my own future reference, but also in case any of you are interested, here is a "how-to" for making the paper flowers that we tried on Monday.

First, you'll need 6 (we used 10cm x10cm) squares of decorative paper.


With your first square, lay it in front of you with the corners pointing towards and away from you. Make sure the side of the paper you want visible is facing down on the table.


Take the bottom corner and fold the paper to make it meet the top corner, so that you now have a triangle shaped piece with the folded edge along the bottom/nearest you.


Then take the left corner and fold it up to meet the top corner. Repeat with the right corner.


Unfold the last two folds so that you have a triangle again. This time fold the long folded edge up to the fold you just made/unfolded.


Then unfold these and open up the triangle a little. Re-fold this time changing the direction of the folds, so that you have 3 "kite" shapes next to each other.


Fold over the points of the left and right "kites" and (for a neat finish) tuck the points inside the big triangle.


Then fold the left and right "kites" in half, along the fold lines.


Placing the paper between your thumb and fingers, gently pull from the centre bottom to the top corner to give the paper a slight curve but be careful not to crease or fold this part. Use a very small amount of glue along the edge and gently hold the edges in place for a few seconds. Then leave to dry while you make the rest of the "petals".


Once you have all six petals, choose a straw to use as the stem. Heat a glue gun and use to attach the petals to the straw - try to get them as close as you can so that you can still get the last petal in.


Then if you want to, you can decorate your paper flower using glitter, gems etc. I wanted to keep mine fairly simple, so I used the glue gun to fill the top of the straw and attach a small blue gem to the centre.

I really enjoyed learning to make these paper flowers and can't wait to add to my collection!

Please leave a comment below if you have any questions, give this project a try or have a suggestion for a project I should try...


Tuesday, 16 April 2019

Fashioned from Fabric...

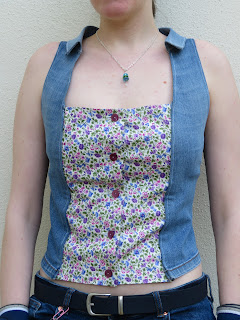
Probably about a year ago, I had a pair of jeans which had developed a hole so they could no longer be worn as jeans. I wanted to use the jeans to make a denim waistcoat. When I'd found a pattern to use, I cut, tacked and machine-stitched the pieces together... Only to find that I was a bit short on fabric! After discussing it with my mum, we decided to get some other fabric to make a "false-shirt" type top. Whilst I am happy with the result, it wasn't what I wanted it to end up as.


A little while before I started making the denim waistcoat/top, one of our green fitted bed-sheets got a bit thin to be used on a mattress, so I convinced my mum to let me keep the sheet to use as fabric for a dress I wanted to make.

I used some of my Top Model books to design a dress that could be made using the sheet. I decided to add some bottle-green lace fabric and a ribbon around the waistline. Of course there were some different versions, but these are two of the designs (unsure at this point if I wanted asymmetrical skirt).

 
After visiting a couple of local fabric shops and our nearest Hobbycraft store (at Fort Kinaird) without any luck finding green lace fabric, I was almost ready to give up and think of something else. Then on Saturday 9th March 2019, Borders Scrap Store had an open day! (- which is great because they are now only open Tuesday-Thursday which means I can't go.) This was a really good day as I managed to find two dress-making patterns I liked AND, right at the bottom of the box of scraps was  … wait for it … GREEN LACE FABRIC!!!!! (can you tell how ridiculously happy that made me?(!) So at last, I could start making the dress!

This was quite a long process and unfortunately I didn't photograph any of it. One of these days I'll learn just to photograph all of my projects, just in case. Anyway here is the finished article:

The original idea was to have the dress and waistcoat form an outfit (however, with the lack of denim and use of other fabric, this would no longer work.)

However, I now have two pairs of jeans which both have holes (in the same place as each other and as the first pair... don't know what I'm doing to my poor jeans.) So now I can go back to my original plan/design and have a completely denim waistcoat to go with my new dress.

I think I might use the pattern I used for the dress bodice so that the waistcoat is more fitted as per my original design. I'd also like to re-use one of the zips from the jeans but I guess I'll just see how I get on.

I hope to do a series of posts on "upcycling" projects that I do (next time with more photos of the stages/process!) Please leave a comment below if you'd be interested in this or if you have any questions about these projects...


Friday, 12 April 2019

February - Panoramic Poppy Painting

I wanted to do a painting that was a daily reminder of the sacrifices that were made to give us the freedom we have today. I've done other things related to "Remembrance" before, including music/song and a Remembrance version of the "Remember, Remember..." poem, but I hadn't thought of a way to get the emotions across that I wanted to. 

One day, when I wasn't really thinking about it, I suddenly got this idea and sketched it in a panoramic sketchbook for me to put onto canvas later on. The plan was to have a panoramic canvas to suggest the vastness of the battlefields; a "river" of poppies to suggest the huge number of fallen soldiers, with some more detailed poppies at the front; and a lone soldier, kneeling in memory of his comrades. I decided to do the poppies in full colour but the rest of the landscape in grayscale to create a very dramatic image. This is the end result which I am really pleased with.


In case any of you are interested, here's how I did it.

I started by drawing the big poppies at the front and then sketched out the horizon and "river" of poppies.


I then used Inktense pencils to do the big poppies (petals and stems) and let them dry before doing the "river" of poppies and the black centres of the big poppies..


While the poppies were drying, I used drawing ink to create a fairly dark sky. I wanted it to suggest dusk or sunset, which I think it does in the finished painting.


My initial plan was to have the land very foggy with only the poppies and the soldier being clearly visible but when I tried to do this, the ink dried looking really "blotchy" so I put another layer of ink on and tried to keep it as even as possible. While this left the land looking quite flat, the idea was to have the focus on the poppies so I think this is ok. Once everything was dry, I used some darker drawing ink for the soldier.


Overall, I'm really pleased with this painting. I think if tried this again, then I would have the big poppies fill more of the canvas, and I'd maybe make the soldier a bit bigger. However, I like that the emptiness of the landscape gives a feeling of isolation, as I think many of the soldiers may have felt this way upon returning  from the battlefields to civilian life - as their families back home probably wouldn't have understood how they were feeling.

Please leave a comment below if you have any questions or opinions to share on this topic...


February - DIY Upcycled CD Rack

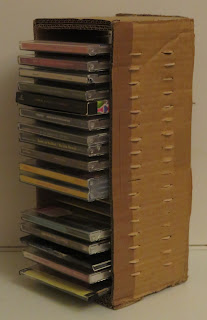
If you've ever had a "fancy" CD rack (e.g. shaped like a mini guitar), you might know that they aren't very well balanced and can create a cascade of CDs with the slightest knock. I'd had enough of having to re-sort my CDs, so I came up with a really simple but very useful (and stable!) CD Rack using only Cardboard and Jumbo Lolly Sticks held together using a glue gun. One of the best parts about this is adjustable shelf heights so you can get your multi-CD boxes in the same rack as your single-CD boxes.


You will need:

Materials:
Cardboard
Jumbo Lolly Sticks

Equipment:
Pencil
Ruler
Knife & Cutting mat
Parcel tape (optional)
Glue gun

For the vertical parts of the rack, I used 3 pieces of cardboard from the 'flaps' of a cardboard box. On 2 of the 'flaps', I used a ruler and pencil to mark 1.5cm intervals along the length and at 2cm, 4cm, 7cm and 9cm across the short side(starting from the straight edge, for a neat finish). Using a pencil, join the 1.5cm marks across the short side and join the 2-4cm and 7-9cm marks along the length of the 'flaps' to create a sort of grid/ladder.


With the 'flap' landscape in front of you, cut the vertical  lines (between 2-4cm and 7-9cm marks) to make slots for the lolly stick shelves. Use a lolly stick to make the slots slightly wider and easier to use when the cardboard is all glued together.


I then cut 4 pieces slightly wider than a CD box for the top and base of the rack. I used a glue gun to stick 2 of these pieces together so that I had a pair of double-thickness cardboard pieces.

Using the glue gun, I attached the top/base and side pieces and then attached the 3rd 'flap' to the back so that the CDs wouldn't fall out. Once the glue had set, I pushed the lolly sticks through the slots so that a little bit poked out each side of the rack. (Note: If you put the back lolly sticks in first, it makes putting the bottom shelves in easier as you don't have to get your hand in a 1.5cm space.) When all the lolly sticks were in place, I used some parcel tape to keep the middle of the back piece from bulging with the weight of the CDs.


Eh Voila! An upcycled CD Rack using cardboard and jumbo lolly sticks with adjustable shelves! Please leave a comment below if you have a go at this DIY - I'd love to hear how you get on... 


Thursday, 11 April 2019

January/February - Hello Florence - First Children's Book Illustrated!

On 22nd of January, I was 'commissioned' to illustrate a children's book written by my Aunt for her first grandchild (Florence). My Aunt had knitted 5 teddy bears (4 seasons plus Christmas/Santa) and written prayer-type stories to go with them. The idea was to have a book that could be read to her as well as one she could use when she starts reading for herself.


This book ended up being 24 pages including the outside cover, etc. and had 17 original illustrations. The final version was sent to my Aunt about 4 weeks after she 'commissioned' me.

For each section, there were 3 illustrations - a picture with the relevant teddy bear; a "cute" animal; and a seasonally appropriate scene or image. In the book itself, I used an oval, soft edge 'frame' to give all of the illustrations a neat edge.

Middle page from Summer section


Here is a selection of the illustrations (without the 'frames'):

All images Copyright Catherine Bird 2019.

Spring - Snowdrops & Daffodils


Summer - Seaside


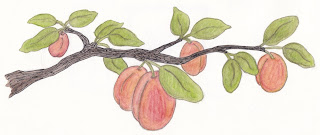
Autumn - Plums


Winter - Red Squirrel


Christmas - "Love is everywhere"/ Watchnight Service


Overall, I'm really happy with this book. I thoroughly enjoyed illustrating it and look forward to trying my hand at more children's books in the future - maybe even some of my own stories too someday!

We're trying to work out a way to make this more sellable (by not using the name Florence) but need something between "Hello Friend" and "Hello Lifeform"(!) Please leave a comment below if you have any ideas...


December - DIY Frosted Pinecones

I based this project on an idea I saw on Pinterest when I was looking for Christmas crafts that I could do. I thought it looked like a really simple but effective way to add another decoration to our home. There are a few different ways to do this - I tried spray snow but it never dries (maybe I'm doing something wrong?) and fake snow (basically shredded/flaked cellophane) but it doesn't look very realistic. (You could also paint the ends with white paint but, personally, I didn't think that looked very good either.) We then got some Epsom Salts and I tried that and it looks realistic and dries properly! Although it was a bit messy trying to get the glue on the cones (there isn't really anything to hold on to), I think the end result is well worth it!


You will need:
Pinecones
Epsom Salts
Glue
Old paintbrush
Kitchen paper (or something to leave them on while they dry)
Glass vase/jar

If you are collecting your own pinecones, you need to line an oven proof tray (e.g. large swiss roll tin) with tin foil and bake the pinecones at 200F/100C for 30- 45 mins to remove any "wee beasties" before you can do the next stage.

Once the pinecones had been baked and cooled, I mixed some PVA glue with a little water and used the paintbrush to apply it to the pinecone (do one or two cones at a time otherwise the glue might dry before you get the Epsom Salts on them).


I then dipped the pinecone into a small pot of Epsom Salts until the glue was covered. Gently shake off any excess and set aside to dry completely. Repeat for all the pinecones you want to have frosted.


When they are all dry, it's time to display them. I used two matching glass vases that we have on a mantlepiece, but you could use an empty fruit bowl or a "hurricane jar".

And there you have it - Frosted Pinecones! Please leave a comment below if you have any questions or if you give this project a try...